Getting Started |
您所在的位置:网站首页 › logitech support › Getting Started |
Getting Started
|
QUICK SETUPGo to the interactive setup guide for quick interactive setup instructions. If you want more in-depth information, go to the Detailed Setup below. DETAILED SETUP Make sure the mouse is turned on.The On/Off switch is located on the bottom of the mouse. The number 1 LED on the bottom of the mouse should be blinking fast.NOTE: If the LED is not blinking fast, do a long press of three seconds on the Easy-Switch button on the mouse bottom.
There are two ways you can connect your mouse:
Use the wireless USB receiverPlug the receiver into a USB port on your computer.
Connect directly via BluetoothOpen the Bluetooth settings on your computer to complete the pairing.Search for new devices and click on MX Anywhere 3 to connect.Click here for more details on how to do this on your computer.If you experience issues with Bluetooth, click here for Bluetooth troubleshooting.
Install Logitech Options Software.Download Logitech Options to customize your mouse and benefit from advanced shortcuts and all the possibilities this mouse has to offer. To download and learn more about the full range of features, go to logitech.com/options. The number 1 LED on the bottom of the mouse should be blinking fast.NOTE: If the LED is not blinking fast, do a long press of three seconds on the Easy-Switch button on the mouse bottom.
There are two ways you can connect your mouse:
Use the wireless USB receiverPlug the receiver into a USB port on your computer.
Connect directly via BluetoothOpen the Bluetooth settings on your computer to complete the pairing.Search for new devices and click on MX Anywhere 3 to connect.Click here for more details on how to do this on your computer.If you experience issues with Bluetooth, click here for Bluetooth troubleshooting.
Install Logitech Options Software.Download Logitech Options to customize your mouse and benefit from advanced shortcuts and all the possibilities this mouse has to offer. To download and learn more about the full range of features, go to logitech.com/options.
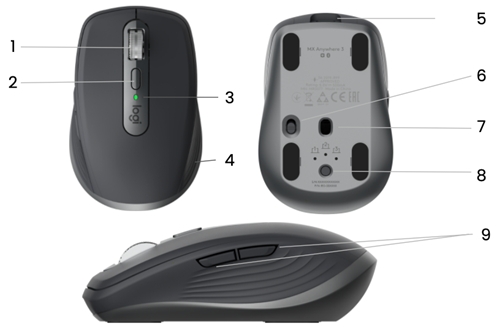
LEARN MORE ABOUT YOUR PRODUCT Product Overview
YOU CAN PAIR TO A SECOND COMPUTER WITH EASY-SWITCH Your mouse can be paired with up to three different computers using the Easy-Switch button to change the channel.
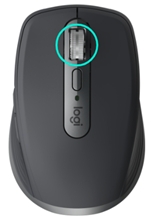
MagSpeed adaptive scroll-wheel with SmartShift
The speed-adaptive scroll wheel shifts between two scrolling modes automatically. As you scroll faster, it will automatically shift from line-by-line scrolling to free-spinning. Line-by-line (ratchet) mode — ideal for precise navigation of items and lists. Hyper-fast (free-spin) mode — near-frictionless spinning, letting you fly through long documents and web pages.
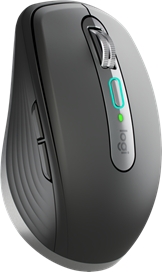
Switch modes manually You can also manually switch between modes by pressing the mode shift button.
By default, mode shift is assigned to the button on top of the mouse. In Logitech Options software, you can decide to disable SmartShift if you prefer to stay in one scrolling mode and always shift manually. You can also adjust the SmartShift sensitivity, which will change the speed required to automatically shift into free spinning. Horizontal Scroll
You can scroll horizontally with your MX Anywhere 3!This is done with a two-button combination: Press and hold one of the side buttons and scroll with the wheel simultaneously. NOTE: The horizontal scroll is ON by default in your Logitech Options software. You can customize this feature in the Point & Scroll tab in Logitech Options. For more detailed information on Horizontal scroll, click here. Back/Forward buttons The back and forward buttons enhance navigation and simplify tasks. To move back and forward: Press the back or forward button to navigate web or document pages, depending on the location of the mouse pointer.NOTE: On a Mac, enabling the back/forward buttons requires installation of Logitech Options software. In addition to enabling the buttons for use with Macs, Logitech Options software lets you assign other useful functions to the buttons, including undo/redo, OS navigation, volume up/down, and more. App-Specific Settings Your mouse buttons can be assigned to perform different functions for different applications. For instance, you can assign the side buttons to control volume in Spotify, copy/paste in Microsoft Excel, or undo/redo in Adobe Photoshop. When you install Logitech options, you can install predefined app-specific settings that will adapt the mouse button behavior to the selected applications. Here are the app-specific settings we have created for you: 1 2 Default settings Middle Button Back Forward Browser (Chrome, Edge, Safari) Open link in a new tab Back Forward Zoom Middle Button Mute / Unmute Microphone Start/Stop Video Microsoft Excel Pan(Hold and move the mouse) Undo Redo Microsoft Word Pan(Hold and move the mouse) Undo Redo Microsoft PowerPoint Pan(Hold and move the mouse) Undo Redo Adobe Photoshop Pan(Hold and move the mouse) Undo Redo Adobe Premiere Pro Pan(Hold and move the mouse) Undo Redo Apple Final Cut Pro Pan(Hold and move the mouse) Undo Redo With these settings, the wheel mode-shift button retains the same functionality across all applications. Each of these settings can be customized manually, for any application.
Adjust the feel of the scroll wheel When you scroll in Ratchet mode, you can adjust the feel of your scroll wheel on the “Point & Scroll” tab in Logitech Options. A lower force will make the ratchet very subtle and smooth. A higher force will make every ratchet very firm and precise.
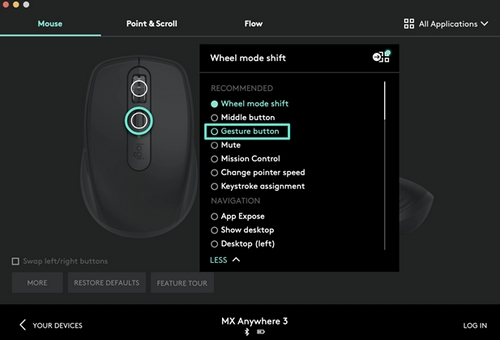
Assign gestures to the top button If you want more advanced functionality, you can assign the top button of the mouse to be the “Gesture Button”. This will transform your top button into a powerful multi-function button allowing you to use gestures for desktop navigation, app management, pan, zoom, and more. On the Mouse tab, select the top button below the wheel and click on Gesture Button. By default, the gesture buttons will allow you to navigate between windows and desktops.
In order to perform the gestures, you will need to hold the button while you move the mouse. Flow between two computers You can work on multiple computers with a single MX Anywhere 3. With Logitech Flow, you can use the mouse cursor to move from one computer to the next. You can even copy and paste between computers, and if you have a compatible Logitech keyboard, such as MX Keys, the keyboard will follow the mouse and switch computers at the same time. You will need to install Logitech Options software on both computers and follow these instructions. Charging MX Anywhere 3
A minimum of a three-minute charge gives you enough power for a full day of use. Depending on how you use the mouse, a full charge can last up to 70 days*.* Battery life may vary depending on user and operating conditions. Check Battery Status The LED on the top of the mouse indicates battery status.
|


 You can install Logitech Options software to receive battery status notifications, including low-charge warnings.
【本文地址】